


Every machine sold or repaired by Thunder Equipment is thoroughly tested which includes launching bumpers prior to shipment. It is advised that after following the suggestions below you still have questions or concerns please contact our office for assistance.
DO NOT ASSUME A COMPLICATED SOLUTION! Almost always problems associated with the launcher have a very simple resolution. Only very infrequently do internal components of the launcher require repairs.
Disassembly of any Thunder Equipment product including case removal immediately VOIDS warranty unless contact has been made with factory previous to discuss problem and resolution. The list of suggestions and hints below is intended to assist with very common user questions.
NEVER attempt troubleshooting activities unless MAP gas is removed from the launcher.
NEVER rotate the bumper cylinders by hand. Worst case this will cause significant damage to the internal working of the machine. Best case it will require retightening of internal components and auto- sequencing readjustment.
OVER 99% OF ALL PROBLEMS ASSOCIATED WITH LAUNCHERS IS ONE OF THE FOLLOWING ITEMS:
1. REMOTE ELECTRONICS
a. Ensure your electronics receiver is properly charged
b. Use electronic contact cleaner, found at any local auto parts store, to clean the contacts that the launcher receiver plug engages with. Many times dirt and debris trapped in the receiver will limit the ability of the launcher plug to make proper contact
2. AA BATTERIES / BATTERY PACK / BATTERY WIRES
a. Are AA batteries fresh and/or new?
b. Batteries installed correctly? Flat (negative) end of battery toward spring side of holder
c. Check to ensure they are properly secured in the battery pack
d. Check to ensure AA batteries are properly secured in their holder. Taping the top and bottom will help retain their position during vibration and field use.
e. Check for corrosion on the battery terminals
f. Check for loose or damaged wires
g. Snap and Unsnap you battery wire contact on the top of the battery pack (if possible)
3. RECEIVER PLUG
a. Broken Plug - Check for any damage to the metal end of the plug. Any deviations, bends, crimps, etc. will cause incomplete contact with your remote electronics.
b. Corroded plug – Unscrew plug body and check for corrosion around the plug contacts that would prohibit proper signal transfer
Many times people incorrectly equate all machine concerns to sequencing or "timing". However, we caution that when someone experiences a concern normally there are much simpler things that have occurred which will prevent proper operation.
The only reason machine sequencing exists is to control where the launcher stops in neutral and charging position. This is necessary for 2 reasons: (1) the magnitude and variation of remote electronics on the market, both age and functionality or (2) excessive handling and field use causing changes to the internal stops preset at the factory.
All launchers manufactured or serviced since January 2015 have mechanical stops installed to help protect against the internal switch changing due to mishandling, significant external impacts to rotator tube, or manual rotator tube rotation that may cause the switch to change and require readjustment.
NEW MACHINES: The internal switch is set at the factory to industry standard remote electronic signal parameters. That could mean that a one-time adjustment may be required out of the box to match a launcher to your electronics. Slight variations in launchers may mean that even if you have multiple launchers some may work properly and some may need adjusted before first use. THIS IS NOT UNCOMMON AND DOES NOT INDICATE DEFECTIVE LAUNCHING EQUIPMENT.
USED MACHINES: Sequencing is something that NORMALLY does not just "change" for any reason. We HIGHLY caution the user to review the troubleshooting hints below before proceeding to adjust sequencing.
After following all of the troubleshooting hints below it is determined that machine sequencing may be necessary a detailed guide is located under the Customer Service tab on www.thunderequipment.com
All launchers built, serviced, or refurbished after January 2016 contain a thermal sensitive sensor which protects the launcher from internal damage. If tripped the switch is designed to automatically reset.
1. Flip power switch to off position and shut off gas/air flow adjustment
2. Allow machine to sit for 15-20 minutes to allow internal components to cool down
3. Turn on power switch. Almost always machine will rotate slightly in order to reset itself in the proper position.
a. If launcher continues to rotate after cool down the internal switch has not reset and will need replaced. This is VERY simple repair and part can be obtained by contacting Thunder Equipment.
4. Look at rotator tubes and cycle remote electronics to make sure Look to ensure launcher is in neutral position.
5. Continue normal use.
In the neutral position – bumper tubes completely misaligned from combustion hole – air/gas mixture does not stop flowing.
1. If your transmitter button is depressed and machine cycles will mixture shut off?
a. Something wrong with batteries, battery box, external battery wires, or electronic receiver. Inspect all components as defined previously and replace as necessary.
2. Turn of side valve to stop flow or remove MAPP cylinder from machine.
3. AA BATTERIES / BATTERY PACK / BATTERY WIRES:
a. Are AA batteries fresh and/or new?
b. Batteries installed correctly? Flat (negative) end of battery toward spring side of holder
c. Check to ensure they are properly secured in the battery pack
d. Check to ensure AA batteries are properly secured in their holder. Taping the top and bottom will help retain their position during vibration and field use.
e. Check for corrosion on the battery terminals
f. Check for loose or damaged wires
g. Snap and Unsnap you battery wire contact on the top of the battery pack (if possible) 4. Sequencing switch needs adjusted. See Sequencing Adjustment under Customer Service tab at www.thunderequipment.com for details.
Disengage MAPP cylinder and check position of rotator plate to determine if launcher is in neutral or charging position.
1. LAUNCHER IN CHARGING POSITION – bumper tubes over combustion hole
a. Disengage MAPP cylinder, attach electronics to machine, and use transmitter button to rotate launcher back to neutral position
b. Reengage MAPP cylinder
2. LAUNCHER IN NEUTRAL POSITION – bumper tubes completely misaligned from combustion hole
a. Disengage MAPP cylinder, attach electronics to machine, and use transmitter to rotate launcher completely through charging and back to neutral position
b. Reinstall MAPP cylinder and determine if air/gas mixture has subsided
i. Answer YES: Problem corrected.
ii. Answer NO: Proceed to above section on AIR/GAS mixture
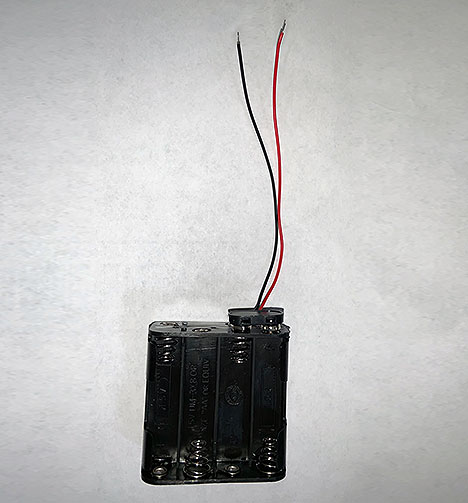
Battery box and connecting wires used to repair any Thunder Equipment Launcher.

Complete wire assembly used to repair any Thunder Equipment Product.
1. REMOTE ELECTRONICS:
a. Ensure your electronics receiver is properly charged
b. Use electronic contact cleaner, found at any local autoparts store, to clean the contacts that the launcher receiver plug engages with. Many times dirt and debris trapped in the receiver will limit the ability of the launcher plug to make proper contact
2. AA BATTERIES / BATTERY PACK / BATTERY WIRES:
a. Are AA batteries fresh and/or new?
b. Batteries installed correctly? Flat (negative) end of battery toward spring side of holder
c. Check to ensure they are properly secured in the battery pack
d. Check to ensure AA batteries are properly secured in their holder. Taping the top and bottom will help retain their position during vibration and field use.
e. Check for corrosion on the battery terminals
f. Check for loose or damaged wires
g. Snap and Unsnap you battery wire contact on the top of the battery pack (if possible)
3. RECEIVER PLUG:
a. Broken Plug - Check for any damage to the metal end of the plug. Any deviations, bends, crimps, etc. will cause incomplete contact with your remote electronics.
b. Corroded plug – Unscrew plug body and check for corrosion around the plug contacts that would prohibit proper signal transfer
4. DOES PROBLEM ONLY OCCUR AT AWAY FROM LAUNCHER AND NOT STANDING NEXT TO IT?
a. Charge or replace batteries in handheld transmitter.
All launchers have an auto-sequencing feature which will automatically adjust internal timing to ensure machine is in its proper position. It is possible that due to abuse, impact, manual rotation of rotator plate, or rough impacts that machine needs to cycle to its next location. Simply installing your electronics and rotating the machine back into neutral position with the transmitter will put the machine back in neutral.
If this occurs frequently it means the internal torque resistance feature has allowed the machine to loosen slightly to protect internal components. It will not hurt the launcher and can be field repaired by calling our office for instructions.
1. NO FAINT CLICKING NOISE: When electronics are attached to machine and transmitter button depressed NO faint clicking noise present inside the machine?
a. Use sound option on electronics to ensure receiver is getting proper signal from transmitter. If no sound, follow electronics instructions to match receiver with transmitter.
b. Dirt or corrosion inside plug of remote electronics not allowing for proper contact with launcher plug. Clean receiver contact by spraying with electronic contact cleaner found at any local auto parts store.
c. Receiver plug is broken or corroded. Replace with 1/8"mono plug or contact Thunder Equipment for complete receiver wire assembly which will snap inside machine.
2. AA BATTERIES / BATTERY PACK / BATTERY WIRES:
a. Are AA batteries fresh and/or new?
b. Batteries installed correctly? Flat (negative) end of battery toward spring side of holder
c. Check to ensure they are properly secured in the battery pack
d. Check to ensure AA batteries are properly secured in their holder. Taping the top and bottom will help retain their position during vibration and field use.
e. Check for corrosion on the battery terminals
f. Check for loose or damaged wires
g. Snap and Unsnap you battery wire contact on the top of the battery pack (if possible)
3. BLUNT IMPACT OR MANUAL ROTATION: Has damage or blunt impact occurred to machine rotator or has it been previously rotated manually?
a. Answer YES: Sequencing switch needs adjusted. See Sequencing Adjustment under Customer Service tab at www.thunderequipment.com for details.
b. Answer NO: Proceed to step #3
4. ROTATOR PLATE BINDING: Is something binding between the rotator plate and machine to prevent it from rotating?
a. Remove obstacle
b. Loosen 7/16" bolt slightly on face of rotator plate and rotate with electronics. If problem resolved plate has been damaged or internal combustion tube is rubbing on back of plate and need to be ground down a little to prevent reoccurrence.
5. Contact Thunder Equipment for assistance. Likely that auto-sequencing switch has been damaged and needs replaced.
1. In the charging position do you hear the air/gas mixture charging the system?
a. Check to see if variable distance valve on side is open.
b. Check to see if gas cylinder is empty
2. Did the problem occur after changing a gas cylinder?
a. Remove gas cylinder and inspect rubber gasket in fitting where tank installs. Not removing gas cylinder after use will potentially, over long periods of time, cause rubber to degrade due to compression of gas cylinder on gasket. Contact Thunder Equipment to obtain new gasket.
b. Remove cylinder and inspect to see if nipple engagement pin is still inside gas fitting.
3. Did the problem occur abruptly or after long-term storage?
a. Answer Long-Term storage: Something is plugging up the combustion or input port inside the machine. Long-term storage in areas where bugs, mice, or other critters can infiltrate the machine can cause it to plug and not create the proper air/gas mixture. In that event the machine is designed not to fire. The ignition system can be cleaned and or field replaced but it is best to contact Thunder Equipment for assistance before proceeding.
b. Answer Abruptly: This would be very unusual after checking # 1 above and you would be advised to contact Thunder Equipment for assistance.
1. If you leave the motor running for about a minute will the rotator plate start turning?
a. Machine is designed to loosen itself internally to protect the motor in the event of abuse, blunt force, or manual rotation of the rotator plate. Let the machine run and the machine will tighten. It is recommended to torque back to factory specifications but will continue to function assuming auto-sequencing switch isn't damaged requiring readjustment. You may notice that after this period when the machine is first turned on it will cycle on its own trying to find its proper position.
2. Contact Thunder Equipment office to proceed
Thunder Equipment Sales Office
Phone: 724-944-2429
Email address: info@thunderequipment.com
Thunder Equipment Factory & Service Repairs
150 Wise Road
Greenville, PA, 16125
• All service returns must be accompanied by our Service Return Form